
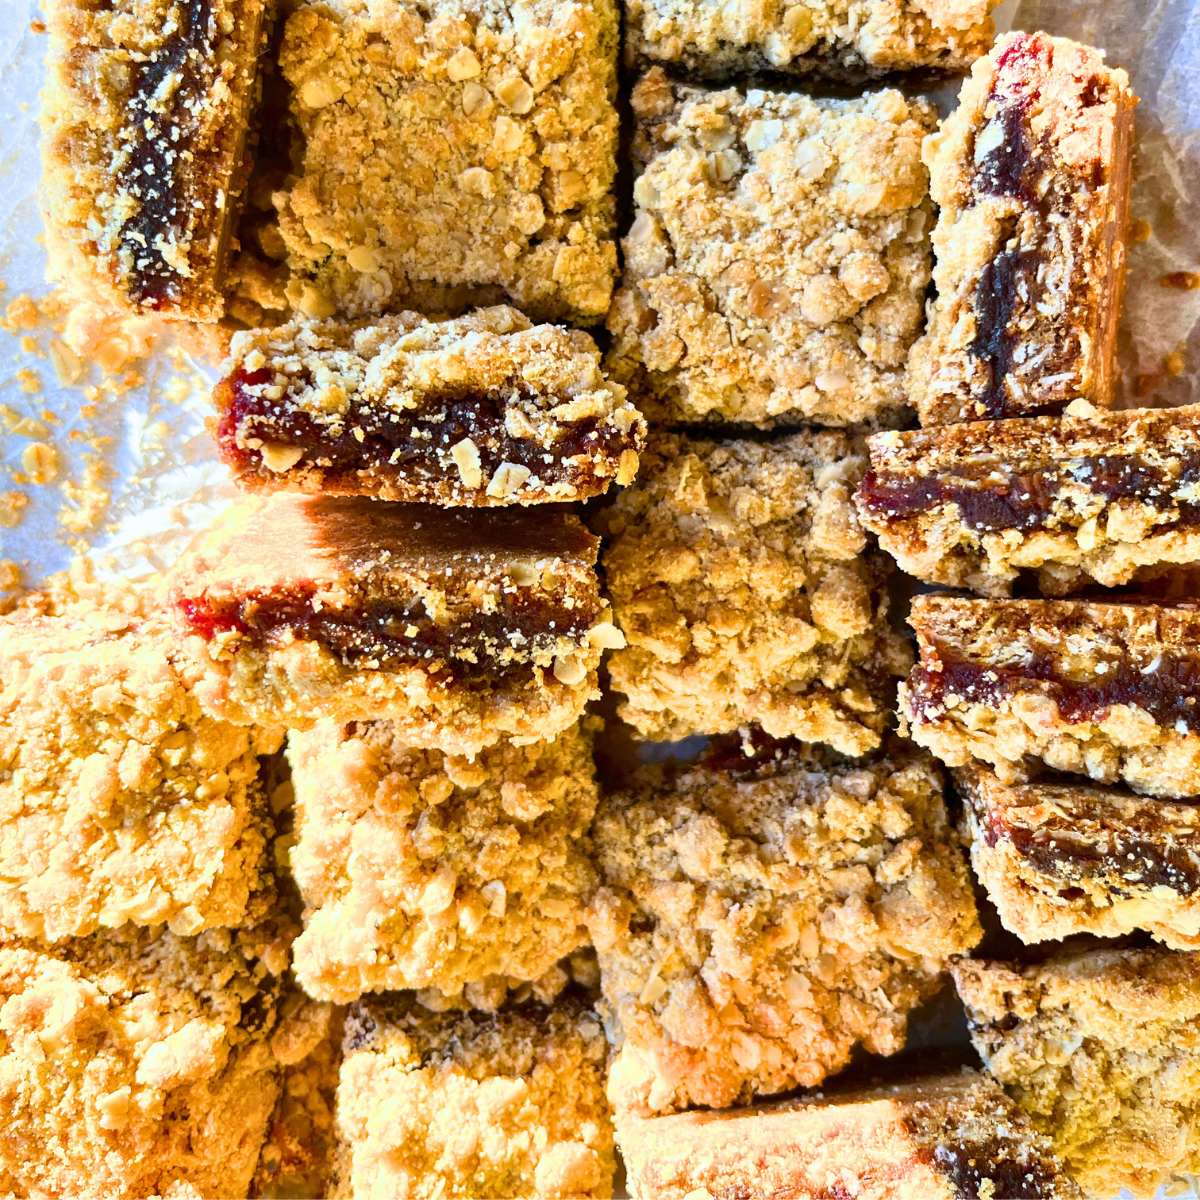
The Best Old-Fashioned Raspberry Mini Tarts
Raspberry tarts are an absolute treat. That rich flaky crust and ruby red fruit filling all in a personal sized little package! Make these beautiful tarts anytime of year using fresh or frozen berries!

The crust I used for this recipe, is my go-to pie crust dough. It is so quick and easy. It always makes the most tender, rich, and flaky crust which is perfect for any sweet or savoury filling.
.. peeping into her dinner basket and mentally calculating if the three juicy, toothsome, raspberry tarts reposing there where divided among ten girls how many bites each girl would have.
The little girls of Avonlea school always pooled their lunches, and to eat three raspberry tarts all alone or even to share them only with one’s best chum would have forever and ever branded as “awful mean” the girl who did it. And yet, when the tarts were divided among ten girls you just got enough to tantalize you.
Diana Barry – Anne of Green Gables
How To Make Individual Raspberry Tarts
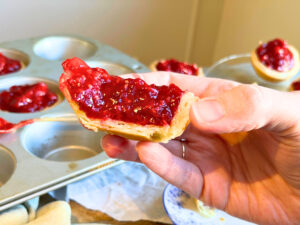
Since these little individual tartlets don’t take long to make in the oven, I prefer to make the tart shells and the filling separately. That way I can make the perfectly tender flaky shells and a thick juicy filling without risking any soggy bottoms!
The filling comes together in no time at all and is just cooked down on the stove top and thickened with cornstarch. A simple filling is all that is needed to showcase the deliciously fruity raspberries!
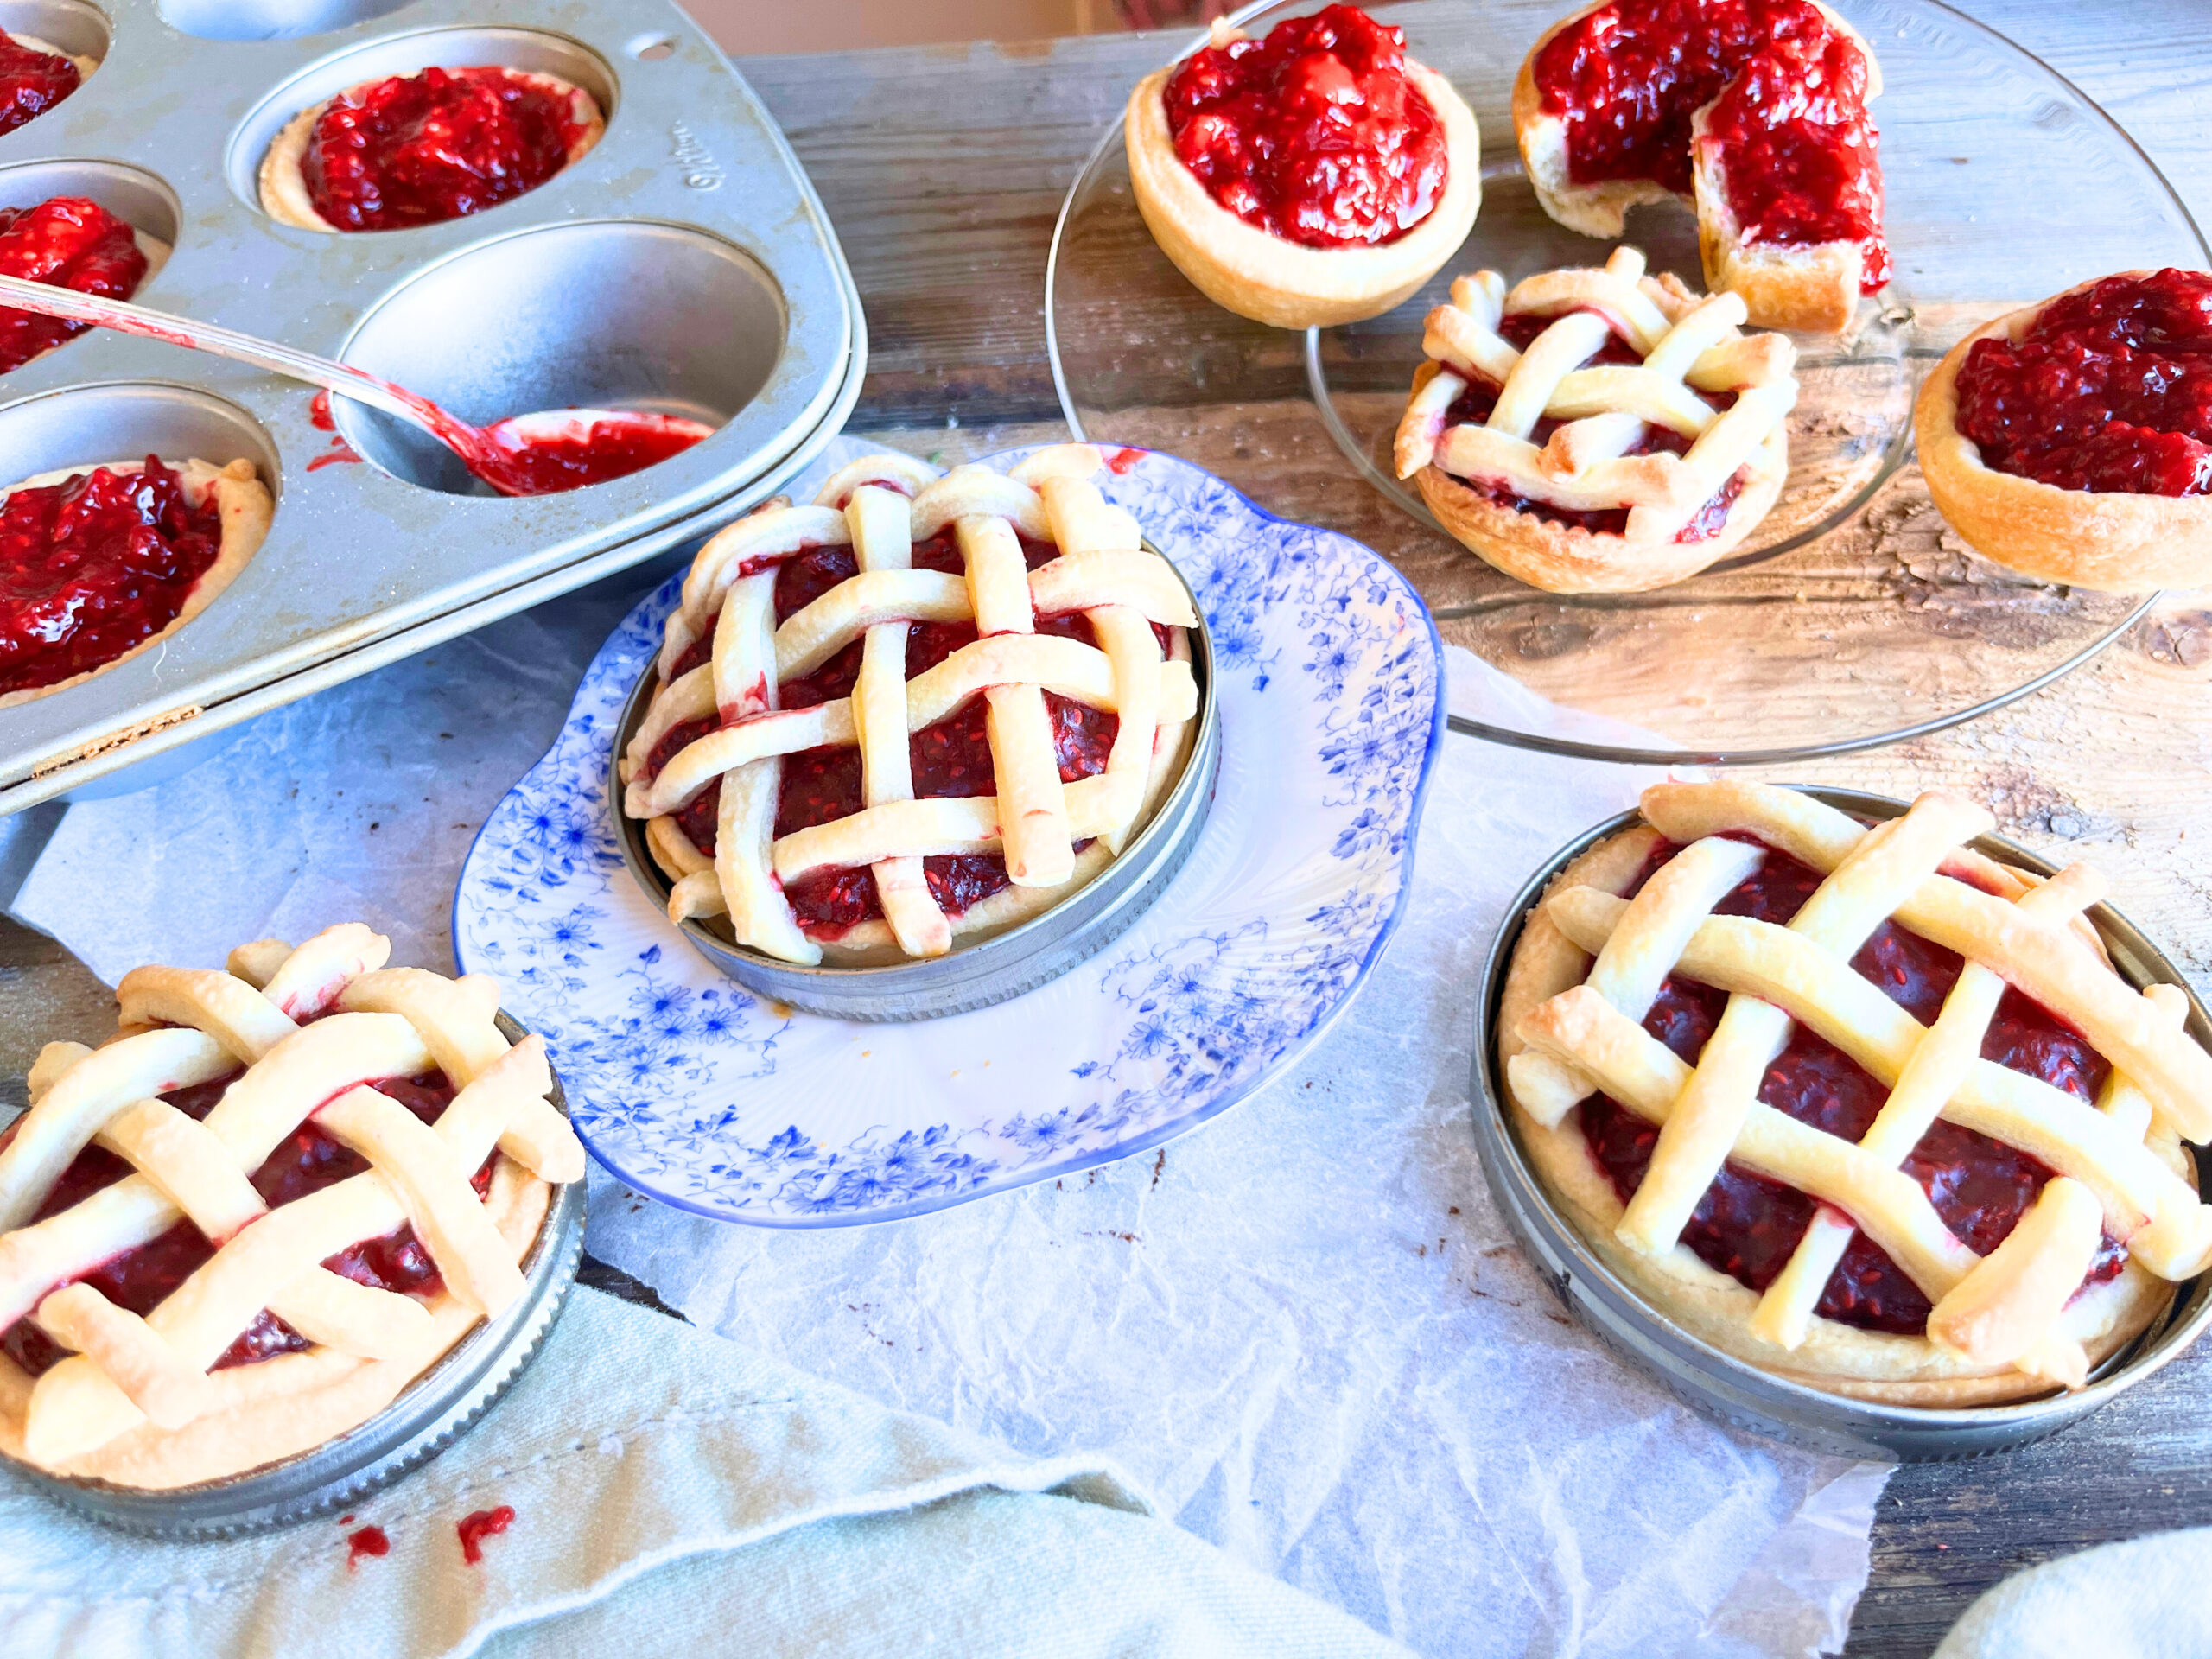
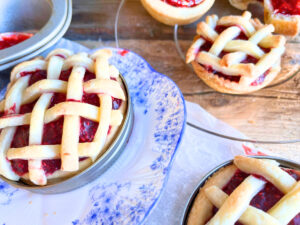
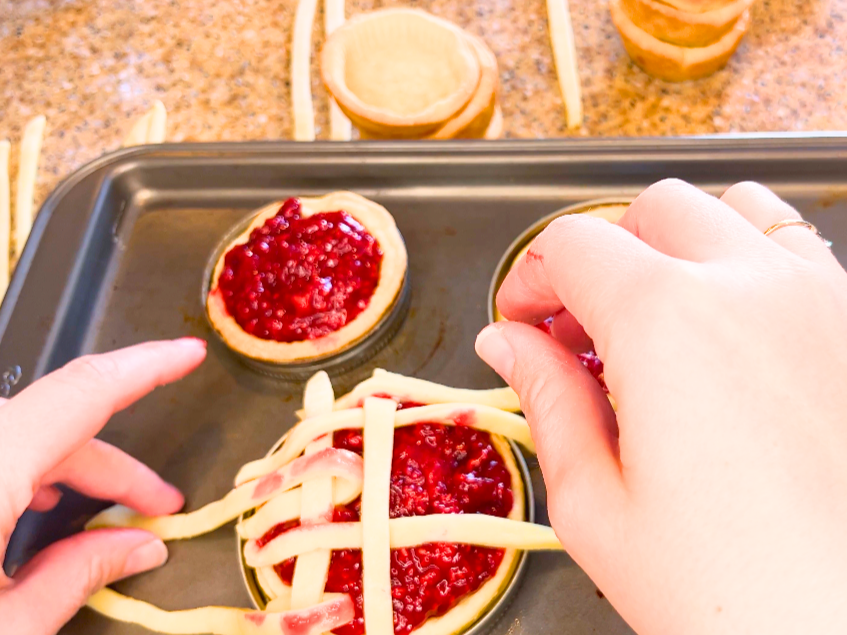
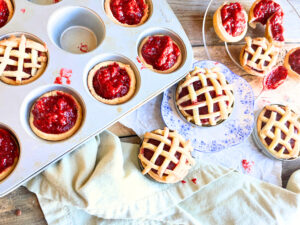
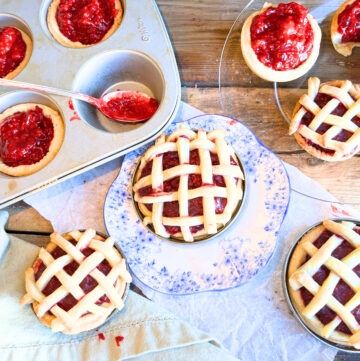
These sweet little tarts are perfect just as they are, but if you want to add a little added flourish, you can make a little lattice top for each tart. Pop it back in the oven for about 10 minutes, or until the pastry on top is lightly golden.
Raspberry Tarts using Muffin tins
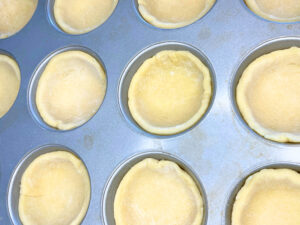
I make my individual raspberry tartlets using a muffin tin. The size, shape, and deepness of a muffin tin is just right for holding the perfect amount of raspberry filling! To make mini raspberry tarts using a muffin tin:
- Grease the inside of each cup, unless you are using a non-stick pan.
- Cut the dough a little bigger than each muffin cup. You can use a large cookie cutter, biscuit cutter, or cup.
- Shape the dough to the inside of the muffin cups.
- Chill in the freezer 15 mins.
- Pierce some holes in the bottom of the shells using a fork.
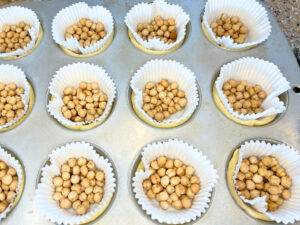
- Place a muffin liner inside each dough shell.
- Place a few tablespoons of dry rice, dried beans, or pie weights inside the liners. This will ensure the tart dough holds its shape while baking.
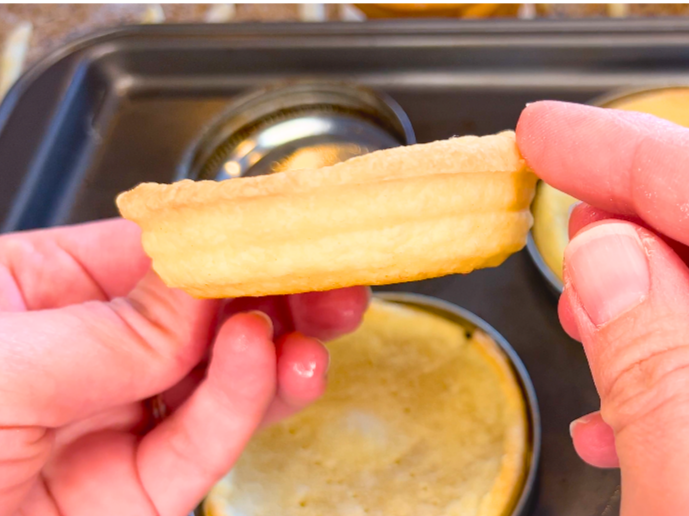
- Bake the shells at 325 ºF (160 ºC) until just starting to colour (about 15 minutes).
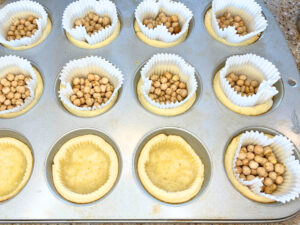
- Remove the muffin liners and weights.
- Return to the oven for another 10-15 minutes, or until the bottom of the shell is fully baked.
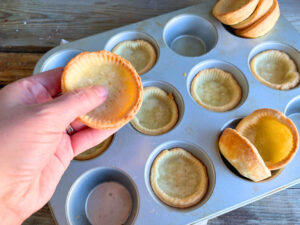
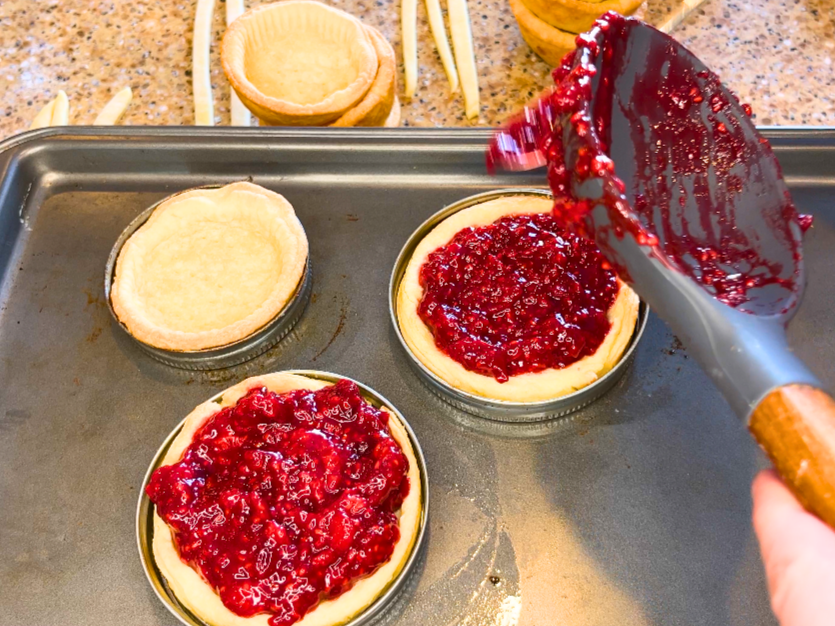
- Fill the cooked tart shells with your prepared filling, all the way to the top of the shell.
- Let the tarts cool before serving.
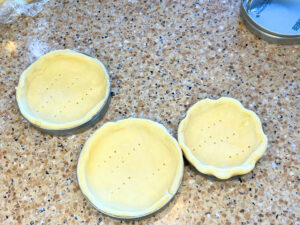
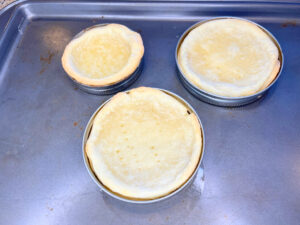
Mini Raspberry Tarts using Canning Jar Lids
This is a super cute alternative to make little mini raspberry pies. To make raspberry tarts shells using Mason jar lids:
- Lightly grease the inside of the canning jar rings.
- Cut out the pie dough a little bigger than each lid.
- Line the lid with the dough making sure to form it all the way up the sides.
- Chill 15 minutes.
- Pierce a few holes in the bottom of the pastry using a fork.
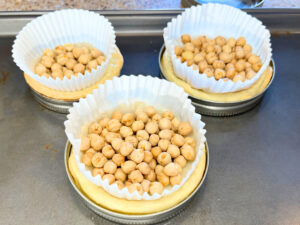
- Form a muffin liner to the inside of the pastry and place a handful of dried rice, dried beans, or pie weights.
- Bake at 325 ºF (160 ºC) for 15 minutes.
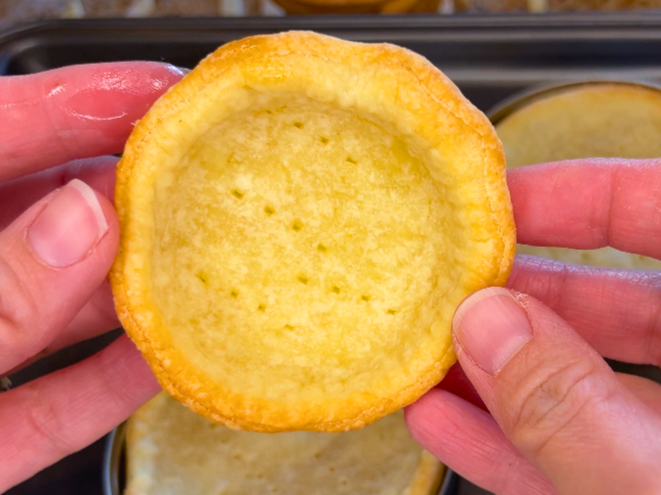
- Remove the liners and weight. Return the pastry to the oven until the bottom is cooked and lightly coloured, about 10 minutes.
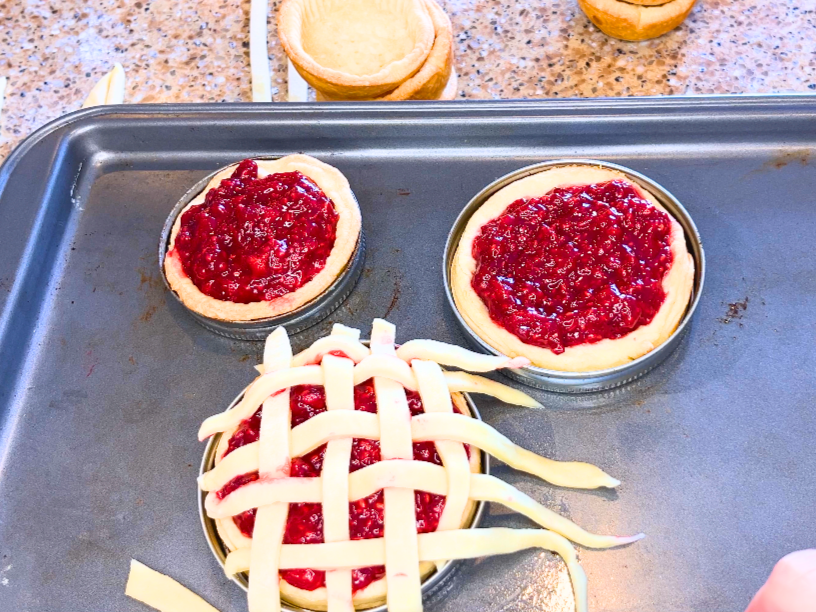
- Fill the shells with the prepared filling, all the way to the top of the shell.
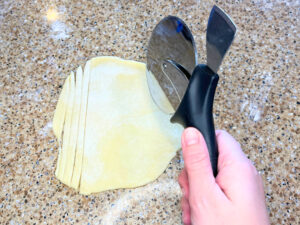
- Cut little strips of dough and form a lattice on top of each mini pie.
- Return to the oven until the top is baked and lightly golden, about 10-12 minutes.
- Allow to cool before removing and serving.

Make these sweet treats in half the time by using store bought dough!
Storage
Storing Raspberry Tarts in the Refrigerator
Although, fruit tarts are best enjoyed fresh the day you make them, leftovers can be stored covered in the refrigerator for up to 4 days. After that the crust will loose it’s crispness and the filling will start to dry out.
Freezing Raspberry Tarts
To freeze your raspberry tarts, allow them to come to room temperature. Wrap each in cling-film and place them in an airtight container. They can be kept in the freezer for up to 3 months.
When you are ready to enjoy your tarts, remove from the freezer and let them come back up to room temperature.
Ingredients for Raspberry Mini Tarts
For the Tart shells
2 ¾ cups all-purpose flour 330g
¾ teaspoons salt 3.75 ml
½ teaspoon baking powder 2.5 ml
1 ½ Tablespoons sugar 18 g
1 cup cold butter, cubed 227 g
½ Tablespoon vinegar 7 ml
1 egg
6 Tablespoons cold water (or until dough holds together) 75-90 ml
For the Filling
2 – 400 g bags frozen raspberries (Or fresh raspberries)
1 ½ cup brown sugar
¼ cup cornstarch
1 Tablespoon butter (optional)
Method
For the pastry
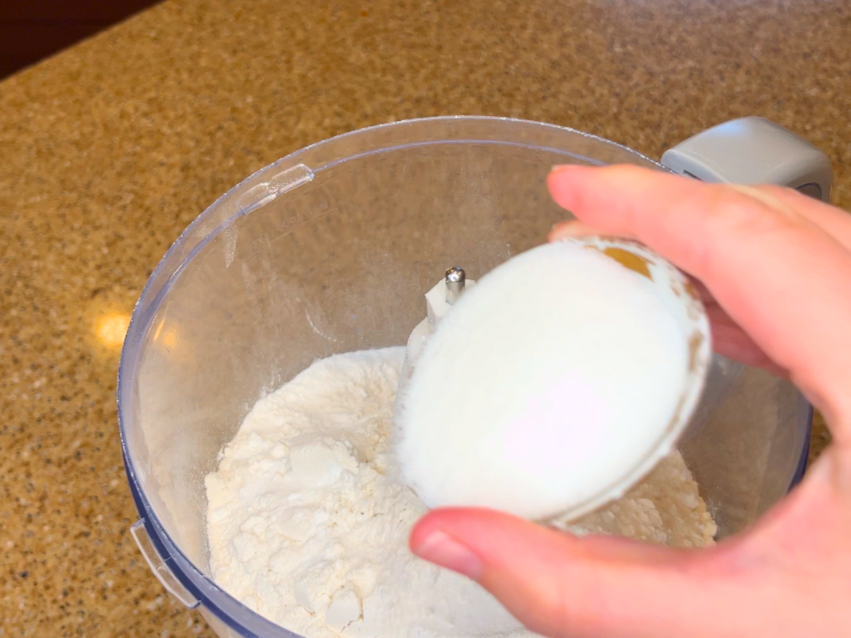
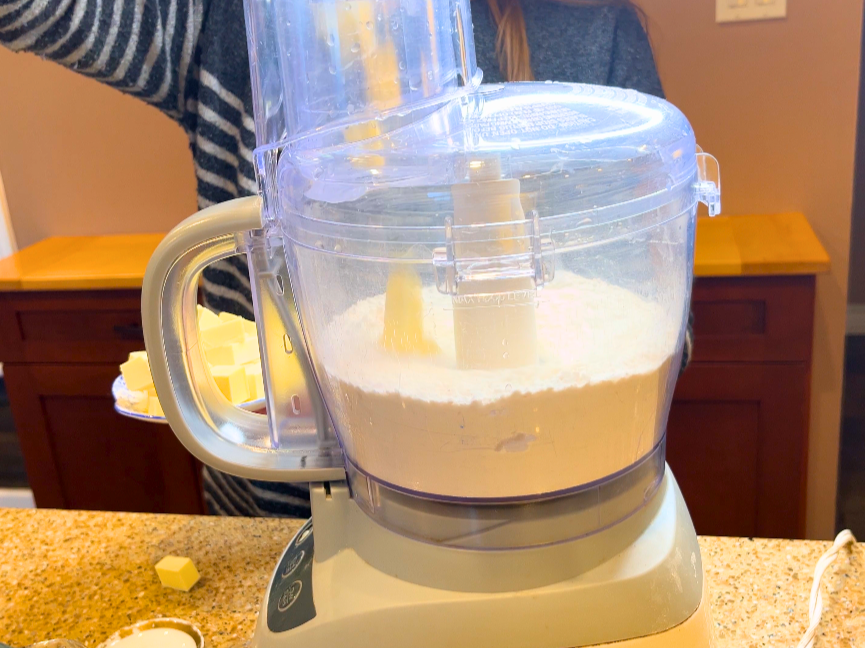
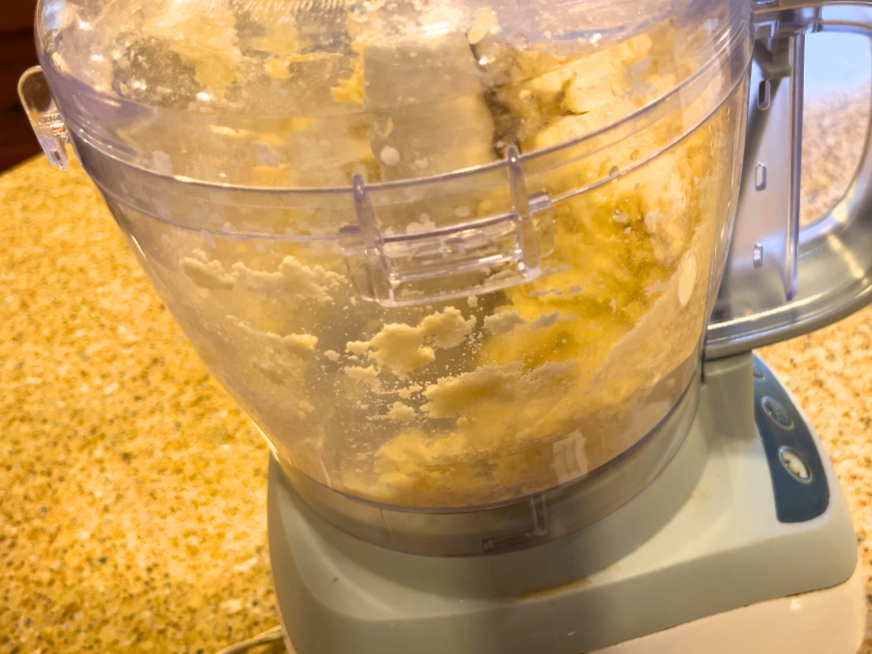
- Using a food processor (or in a large bowl by hand), add the flour, salt, baking powder, and sugar. Pulse to mix.
- With the food processor on low, add the cold butter through the funnel. Stop the machine as soon as all the butter is in. (If by hand, cut the butter into the dry mixture with a pastry blender or rub it through your fingertips until you have a coarse crumb.)
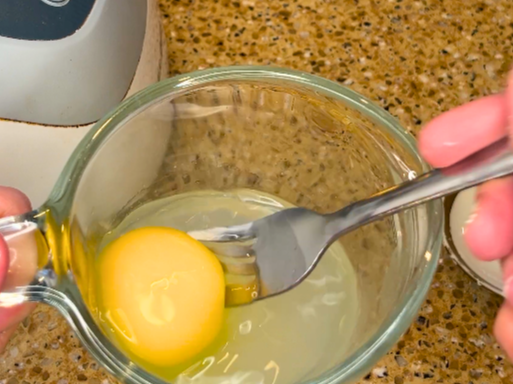
- In a small bowl, mix 6 Tablespoons cold water, vinegar, and 1 egg.
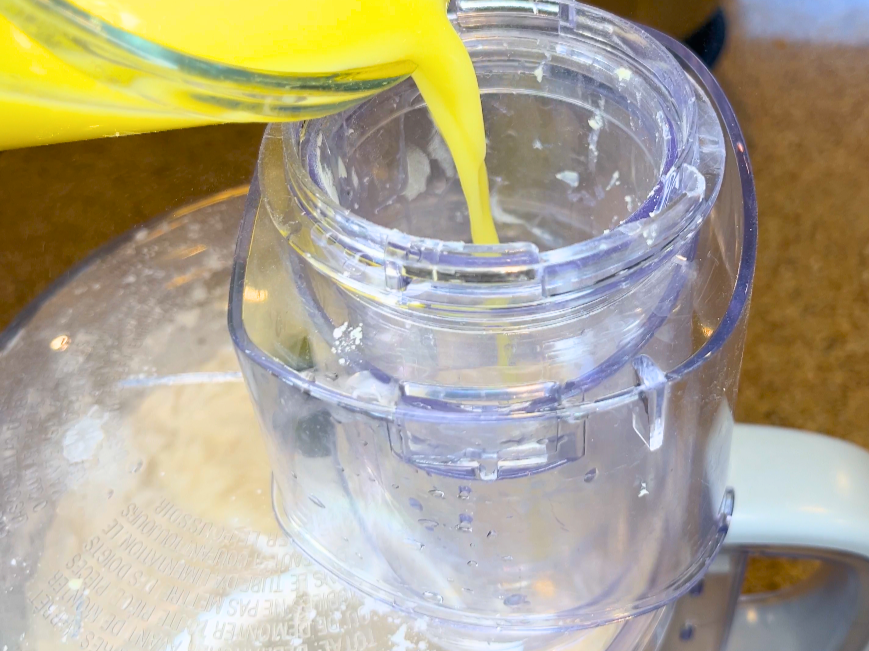
- With the processor on low, pour this mixture through the funnel. The dough should clump together in a few seconds. As soon as this happens stop the processor so you do not over mix the dough. If it is still too dry add a little bit more water. (If by hand, mix the liquid into the dry mixture with your hands until the dough just holds together.)
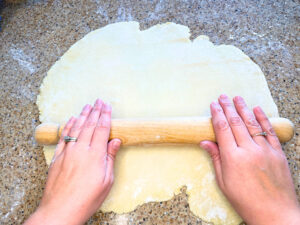
- Let the dough rest 10 mins.
- Roll the dough out on a lightly floured countertop. Move and flip the dough around. Apply more flour as needed to ensure it doesn’t stick.
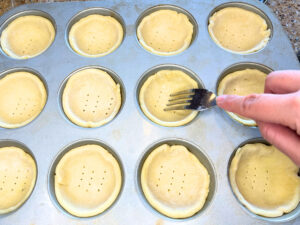
- Using a muffin tin, mini-tart tins, or canning jar lids, cut the dough a little bigger than the tin. (You can use a large cookie cutter, a biscuit cutter, or an upside down cup.)
- Form the dough to the inside and up the sides of the tin.
- Chill in the freezer 15 mins.
- Preheat the oven to 325 ºF (160 ºC).
- Pierce the base of the pastry with holes using a fork.
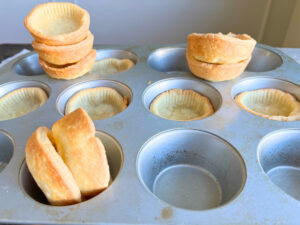
- Form a muffin liner to the inside of each tart pastry and place a few Tablespoons of dried rice, dried beans, or pie weights inside.
- Bake 15 minutes.
- Remove the muffin liners and weights.
- Bake 10-12 mins more, or until the bottom of the tarts are lightly coloured.
For the Filling
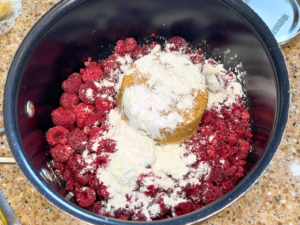
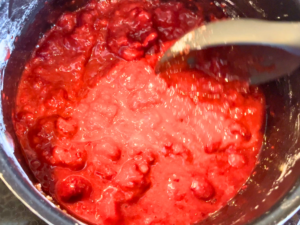
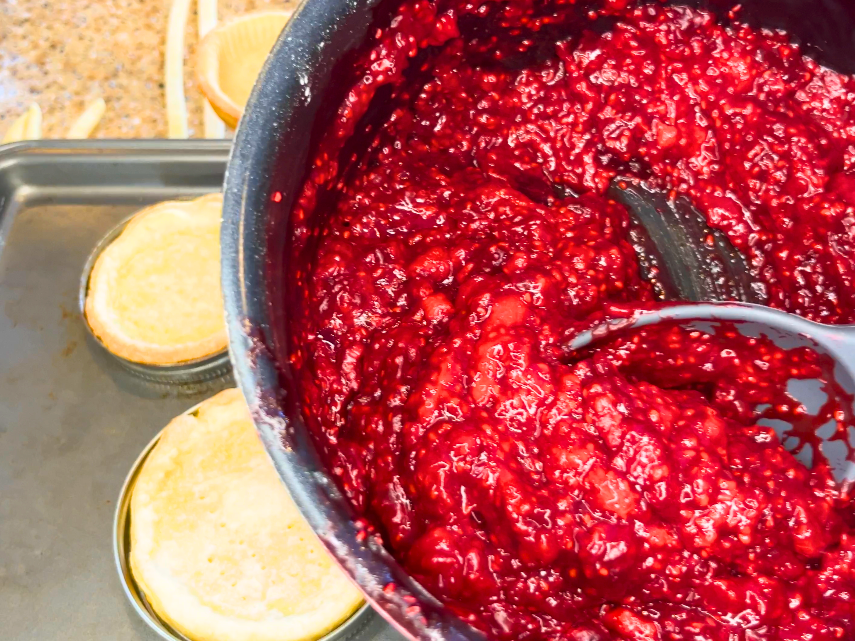
- In a medium sauce pot over medium heat, add the raspberries, either fresh or frozen.
- Mix in the sugar and the cornstarch.
- Cook, stirring occasionally, until it starts to simmer and the berry sauce is thickened.
- Remove from heat and stir in the butter (optional).
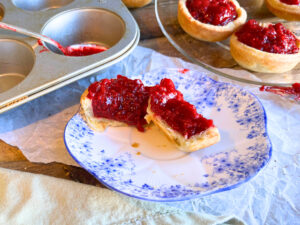
- Fill the cooked tart shells with the raspberry mixture.
- If you want to add a lattice to the top of the mini tarts, cut the dough in thin strips and weave a lattice on top of each filled tart. Press around the edges to seal.
- Return to the oven 10-12 minutes or until the top is cooked and lightly coloured.
- Allow the tarts to cool. Remove from the tins and serve.
Old-Fashioned Raspberry Mini-Tarts
Equipment
- 1 muffin tin
- Canning lids optional
Ingredients
For the Tart shells
- 2 ¾ cups all-purpose flour 330g
- ¾ teaspoons salt 3.75 ml
- ½ teaspoon baking powder 2.5 ml
- 1 ½ Tablespoons sugar 18 g
- 1 cup cold butter cubed 227 g
- ½ Tablespoon vinegar 7 ml
- 1 egg
- 6 Tablespoons cold water or until dough holds together 75-90 ml
For the Filling
- 2 – 400 g bags frozen raspberries Or fresh raspberries
- 1 ½ cup brown sugar
- ¼ cup cornstarch
- 1 Tablespoon butter optional
Instructions
Pastry
- Using a food processor (or in a large bowl by hand), add the flour, salt, baking powder, and sugar. Pulse to mix.
- With the food processor on low, add the cold butter through the funnel. Stop the machine as soon as all the butter is in. (If by hand, cut the butter into the dry mixture with a pastry blender or rub it through your fingertips until you have a coarse crumb.)
- In a small bowl, mix 6 Tablespoons cold water, vinegar, and 1 egg.
- With the processor on low, pour this mixture through the funnel. The dough should clump together in a few seconds. As soon as this happens stop the processor so you do not over mix the dough. If it is still too dry add a little bit more water. (If by hand, mix the liquid into the dry mixture with your hands until the dough just holds together.)
- Let the dough rest 10 mins.
- Roll the dough out on a lightly floured countertop. Move and flip the dough around. Apply more flour as needed to ensure it doesn’t stick.
- Using a muffin tin, mini tart tins, or canning jar lids, cut the dough a little bigger than the tin. (You can use a large cookie cutter, a biscuit cutter, or an upside down cup.)
- Form the dough to the inside and up the sides of the tin.
- Chill in the freezer 15 mins.
- Preheat the oven to 325 ºF (160 ºC).
- Pierce the base of the pastry with holes using a fork.
- Form a muffin liner to the inside of each tart pastry and place a few Tablespoons of dried rice, dried beans, or pie weights inside.
- Bake 15 minutes.
- Remove the muffin liners and weights.
- Bake 10-12 mins more, or until the bottom of the tart is lightly coloured.
Raspberry Filling
- In a medium sauce pot over medium heat, add the raspberries, either fresh or frozen.
- Mix in the sugar and the cornstarch.
- Cook, stirring occasionally, until it starts to simmer and the berry sauce is thickened.
- Remove from heat and stir in the butter (optional).
- Fill the tart shells with the raspberry mixture.
- If you want to add a lattice to the top of the mini tarts, cut the dough in thin strips and weave a lattice on top of each filled tart. Press around the edges to seal.
- Return to the oven 10-12 minutes or until the top is cooked and lightly coloured.
- Allow the tarts to cool. Remove from the tins and serve.
Have you made this recipe? How did it go?
Looking for some more uses for pie dough? Give one of these a try! Easy Appetizer – Cheese Straws, From Scratch Honey Apple Pie, The Perfect Pumpkin Pie
One Comment