

Vintage Dreams Crochet Blanket – Free Pattern
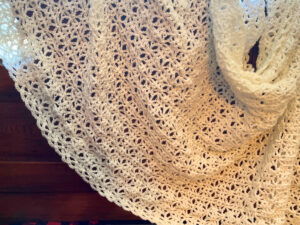
This is an advanced beginner friendly, gorgeous open weave, crochet blanket. This beautiful lacy design is inspired by a vintage crochet shirt that is so delicate and beautiful, I knew it would be perfect for a light and airy baby blanket or throw.
Gage
The gage is not important for this crochet design, as it is a blanket and exact fit is not necessary.
Skill level
If you are a beginner crocheter, making a blanket may seem like a big project to tackle. Naturally, it is one of the bigger project you can make! But after you learn the stitches, you will actually find it easier than making say slippers or gloves! There is no increasing or decreasing, just the same stitches, until you reach your desired size. Pretty easy right?
Since this pattern is a relatively open weave, that means it takes up less yarn, and less time, to make than a blanket pattern that is full of thick cables and textures. So that is a win all around!

Supplies and Materials for Vintage dreams crochet blanket
5 skeins Worsted weight yarn (depending on size you choose)- I used Bernat Big Value in white.
4.5 mm hook
Tapestry needle
scissors
Stitches and abbreviations
ch- chain
sc- single crochet
dc- double crochet
YO – yarn over
st- stitch
sts- stitches
sk- skip
sp- space
beg- beginning
Pattern sizing for vintage dreams crochet blanket
This pattern is made in multiples of 7s, plus 3.
This pattern is written for baby blanket size, throw blanket size will be written in (parentheses)
The baby blankets final measurements should be 36 in. X 36 in. (90 cm X 90 cm)
The lapghan measurements should be 36 in. X 48 in. (90 cm X 120 cm)
The throw blanket final measurements should be 48 in. X 60 in. (120 cm X 160 cm)
Pattern (Vintage dreams crochet blanket)
Video tutorial at the bottom of the post!
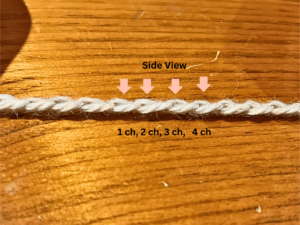
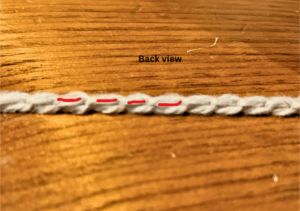
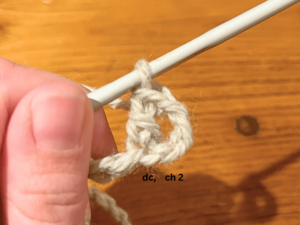

Make a slip stich on your crochet hook and ch 124 (159).
Row 1
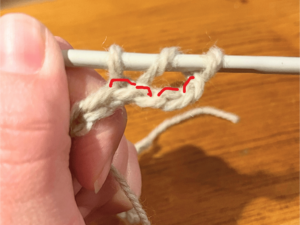
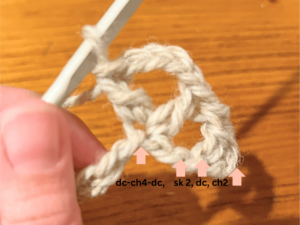
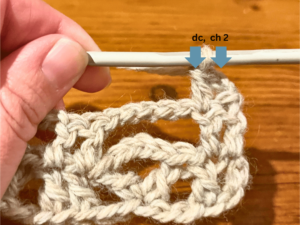
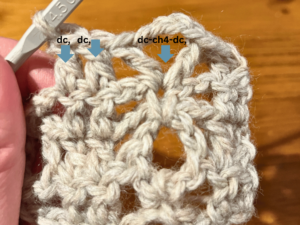
Make a dc in the 4 ch from the hook. Dc in the next st. *Sk the next 2 sts. In the next stitch (dc-ch 4-dc) {all of those stitches in parentheses go in the same ch sp.}. Sk the next 2 sts. Dc in the next 2 ch sps.* repeat the pattern from * to * until the end of the row. For this row you should start and end with the two dc sts. There should be17 (22) pattern repeats.
Row 2

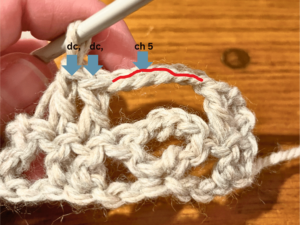
Ch 2 and turn. 1 dc in the top of the second dc from the previous row. *Ch 5, skip the “V shell” created by the dc-ch4-dc from the previous row. 1 dc in the top of the next 2 dc from the previous row.* Repeat from * to * until the end of the row. For this row you should start and end with the two dc sts. There should be 17 (22) pattern repeats.
Row 3
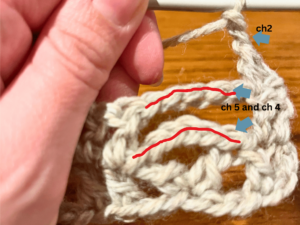
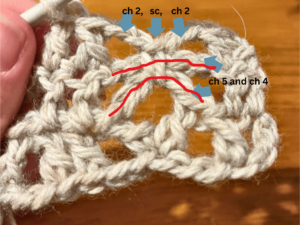
Ch 2 and turn. 1 dc in the top of the second dc from the previous row. * Ch 2. 1 sc around the ch 5 of the previous row, and the ch 4 of the row below that. (This will join the lines made by these chains from the previous two rows.) Ch 2, 1 dc in the top of the next 2 dc from the previous row.* Repeat from * to * until the end of the row. 17 (22) pattern repeats.
Row 4
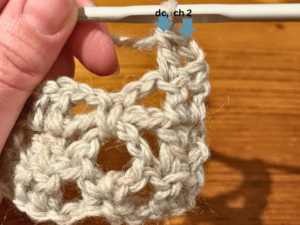
Ch 2 and turn. 1 dc in the top of the second dc from the previous row. * in the sc from the previous row make a group of 1dc-ch 4-1dc. 1 dc in the top of the next 2 dc from the previous row. * Repeat from * to* until the end of the row. 17 (22) pattern repeats.
*Repeat Row 2 to Row 4 until you have your desired length. For baby blanket the length should be 36 in. (90 cm). For a lapghan the length should be 48 in. (120 cm). For a throw blanket the length should be 60 in. (150 cm). Finish with a row 3.
Continue on with the border if desired. Otherwise, tie a knot in the end, cut the yarn and weave in the ends.
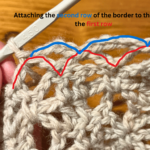
Pattern border for vintage dreams crochet blanket
Since the pattern details throughout the blanket looks more involved and intricate, I wanted to stick to a simpler border.
Round 1
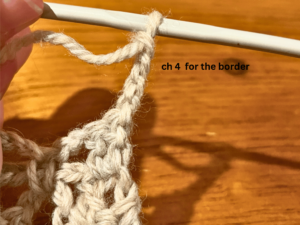

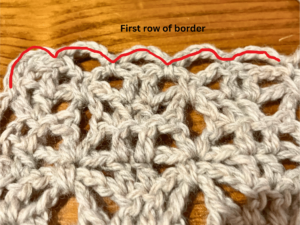
Starting at the corner you finished in, with the yarn still attached, ch 4. *Sk 3 st spaces, sl st to the next st. Ch 4*. Repeat from * to * around the entire perimeter of the blanket. In each corner make an extra ch 4 loop using the same sl st to attach it to the corner. Don’t worry about the sk 3 spaces. Finish with a sl st to the first corner you started in. (The extra “loop in the corner will help the border lay flat and stay in the rectangular shape.)
When you are going down the sides of the blanket, you might find it difficult to distinguish stitches. Estimate the amount of space between each sl st that you made at the top and bottom. Do the same for the sides.
Round 2
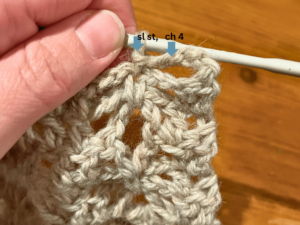
Ch 4, *sl st to the top of the ch 4 sp from the previous round. Ch 4.* Repeat form * to * until you are all the way around the perimeter of the blanket. Finish with a sl st. Tie off the yarn, cut and weave in the ends.
Hope you enjoyed making the blanket! If you have any questions or comments don’t hesitate to drop me a line! Happy Crafting!
Find more crochet creations here! Autumn Moon Crochet Fingerless Gloves, Autumn Mist Crochet Pumpkin Autumn Moon Cozy Crochet Hat
One Comment